
What is the Perfect Tenant & Property Management System?
The Perfect Tenant & Property Management System is a web-based app that helps property managers, landlords, and real estate professionals manage properties, leases, tenants, rent payments, maintenance tasks, expenses, appointments , and more — all in one centralized platform.
Whether you manage a single unit or hundreds of rental properties , this system is designed to streamline your operations, reduce errors, and give you full visibility into your rental business.
Who is this guide for?
This guide is for everyday users of the app :
- Landlords
- Property managers
- Assistants
- Support staff
- Agents handling viewings or lease signings
Getting Started: Creating an Account
Please go to https://property.sarutech.com and click on Create a Free Account to get started
When you create a trial account, your data is stored locally on your system (not on the cloud) and you would only be able to access it on the exact device and platform you used to create the account until you purchase a license.
Once you purchase a license, we weould automatically purchase a managed cloud account and database for you and migrate your data to the cloud. then you will be able to access your data from anywhere and from any device. Please see our pricing page for guidiance on license choice: https://sarutech.com/pricing/property
What does a license give you?
-
Dedicated Support and Onboarding
- Once you purchase a license we would organize an onboarding call. this typically takes 1 - 2 hours.
- During this call
- We would provide training on how to use the system
- We would help you set up your user roles and permissions
- We would help and show you how to customize the system: setting your currenncy, language, adjusting and customizin the various forms
- We would also show you how and support with migrating your existing data from Excel or your previous software.
- Please reach out to us if you have purchased a license but have not gone through the onboarding process
-
A Tenant Portal. You will get your own customized Tenant Portal.
- This would have your logo, and branding, and a dedicated url with your name on the url
- Once you enter your tenants on the app and enter their email address, they would be able to login to the tenant portal using their email address.
- A contractor / Technician portal that allows contractors to send quotations on maintenance requests and create invoices
Getting Started: Accessing the App
Once your account is created, you’ll be given:
- A username and password
- A web link to access the app
- Role-based access to view or manage different areas
When you log in , you’ll see the main dashboard and property management tools.
Main Dashboard Overview
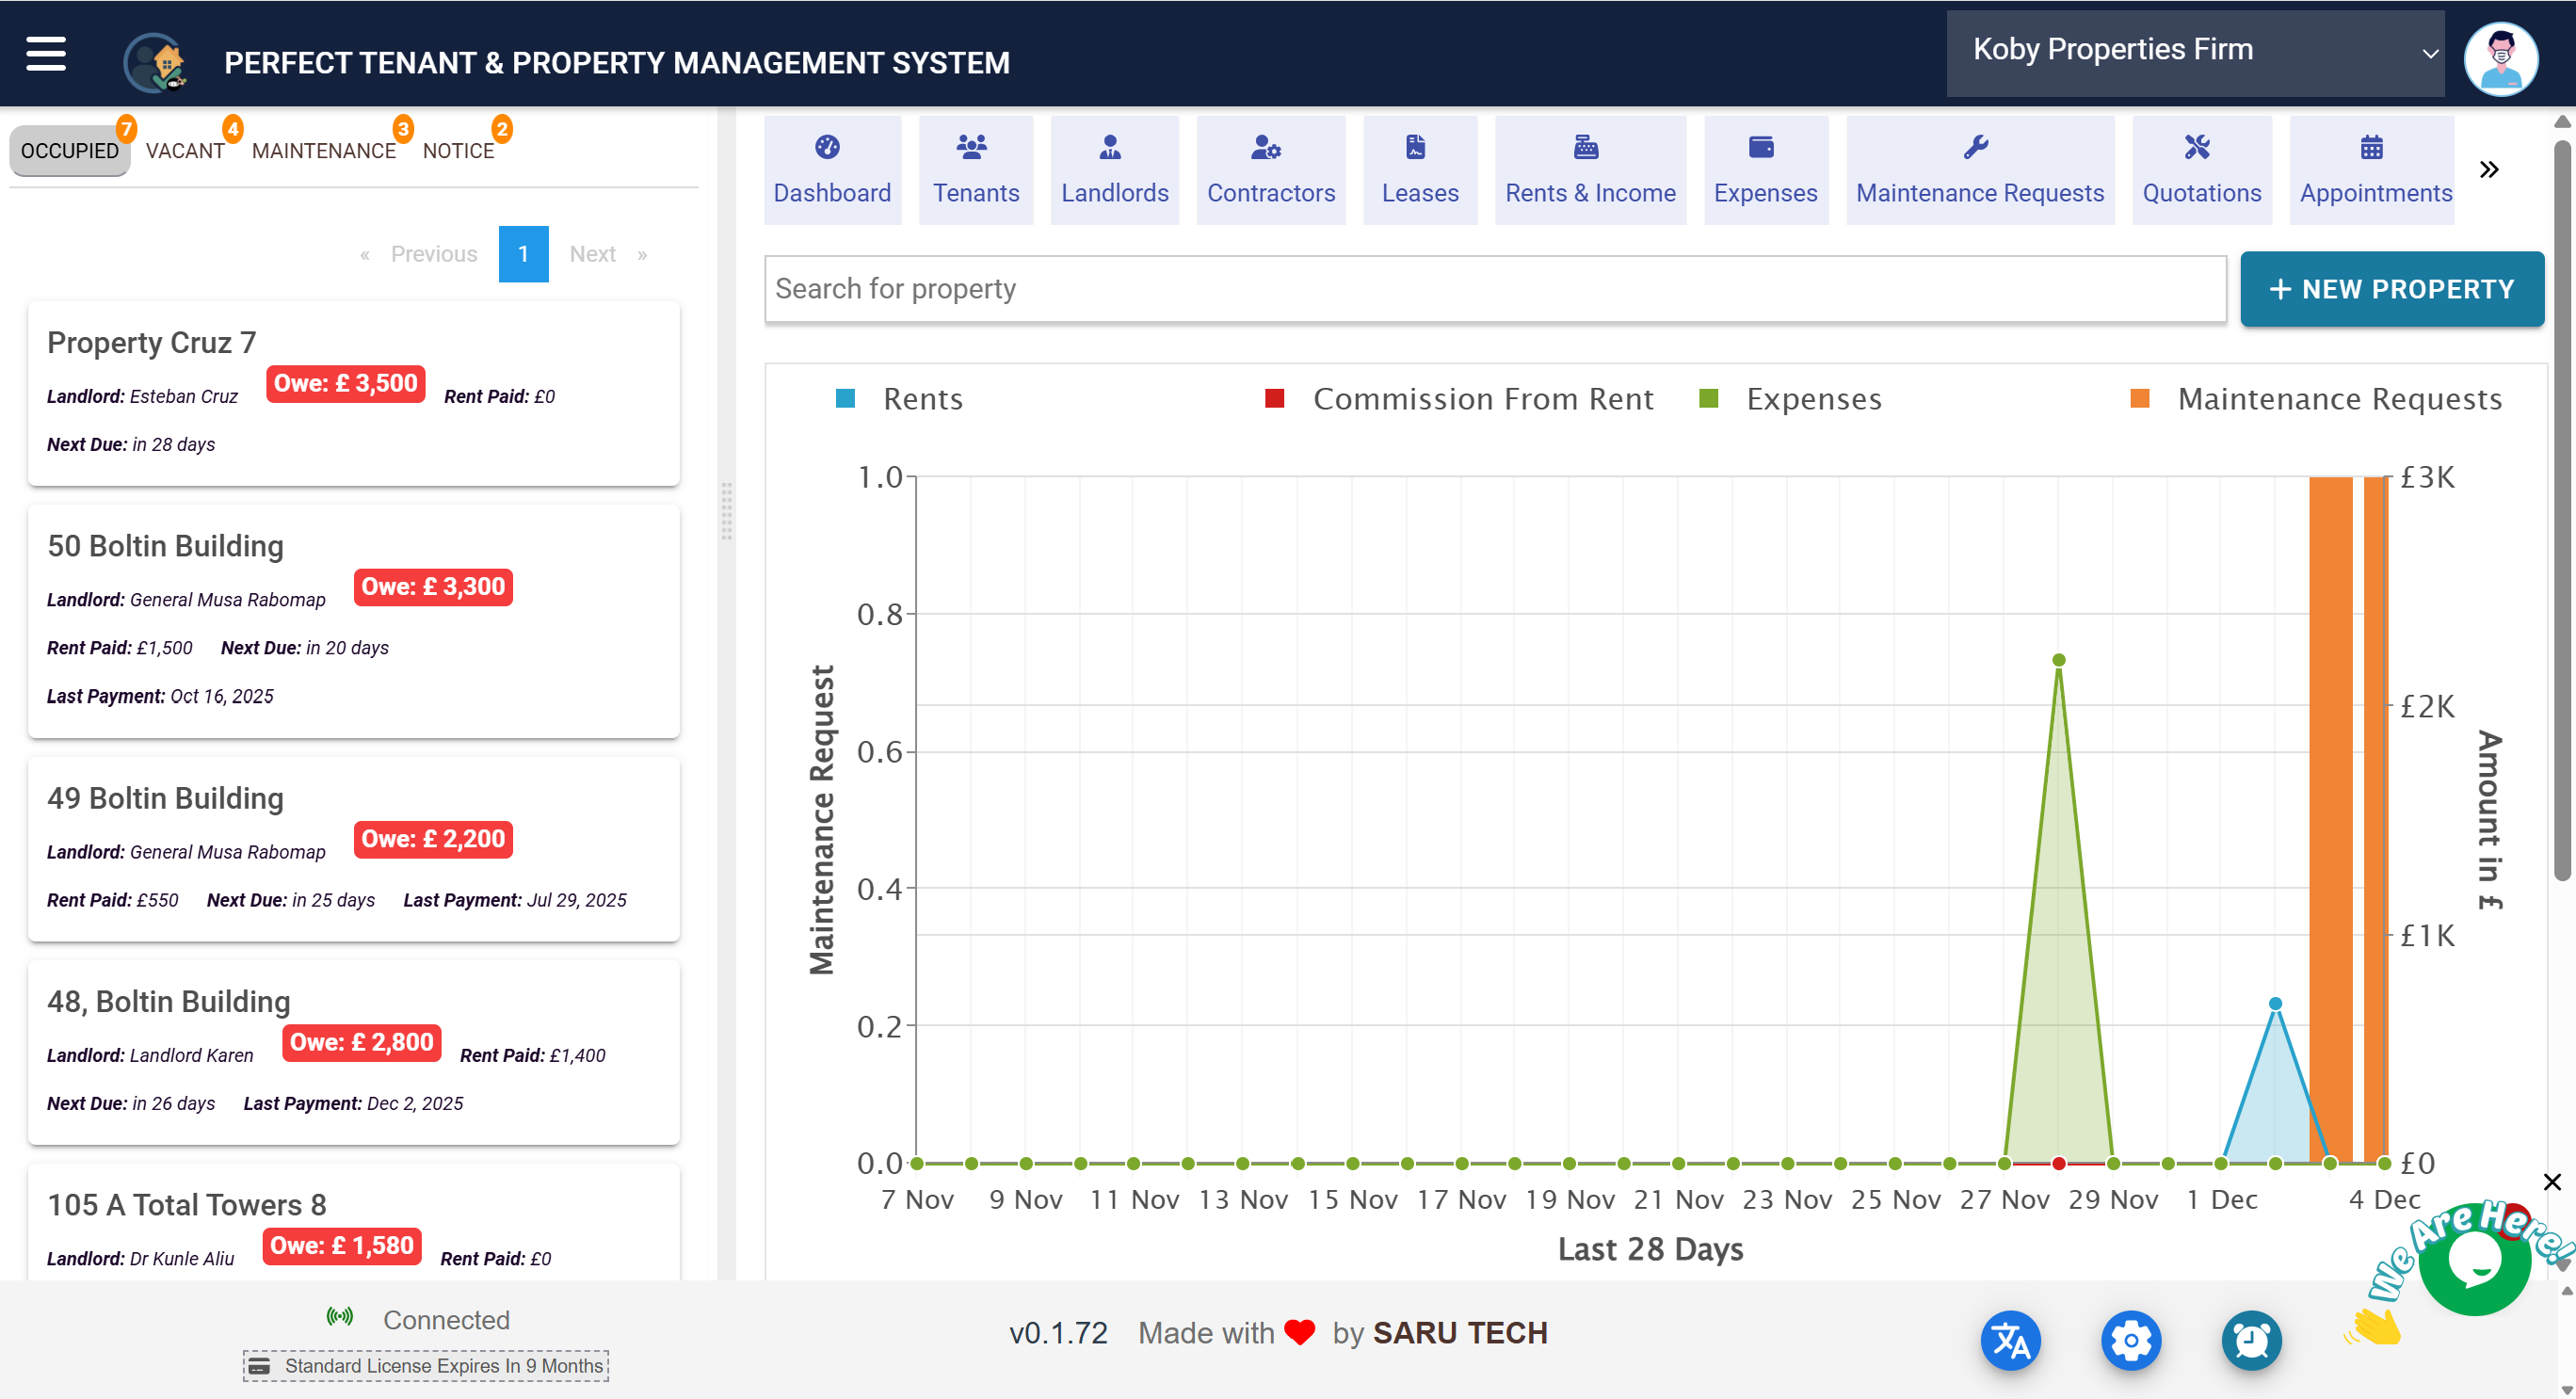
After logging in, you’ll typically land on the Property Management Page . This page is the control center for all property-related operations.
Here's how the page is structured:
- There’s a search bar to quickly find a property by name or address.
- You can add a new property by clicking the ➕ (add) button.
Left Panel: Property List & Filters
There are four Tabs on the Left to help you with various workflows:
- Occupied : Useful for managing occupied properties, managing rents, expenses, raising maintenance requests...
- Vacant : Useful for managing vacant properties, searching for tenants, signing lease agreements
- Maintenance : Useful for managing properties under maintenance. Sending out quotation requests, approving quotations, and attending to invoices
- Notices : Useful for handling properties with termination notice, managing end of tenancy processes, and preparing property for next tenant
Each property is shown as a card , and includes useful summaries:
- Rent frequency (e.g., monthly)
- Date of last rent paid
- Amount Owed
- Total Rent Paid
- Name of the current tenant
- Name of the landlord
Click on any property to open its details on the right pane .
Right Panel: Property Details & Actions
Once a property is selected, you'll see several tabs and action buttons on the right-hand side. This is where you manage everything related to that property .
The right panel is organized into tabs , each showing a different aspect of the property (like a folder system).
Managing a Property — Tabs & Tools
You’ll see tabs like:
- Property Info 🏘️
- Lease Agreement 📄
- Rent & Incomes 💰
- Maintenance & Quotations 🛠️
- Expense 💳
- Appointments 📆
- Tasks ✅
- Files 📁
- Comments 💬
- Forms
- Timeline 🕓
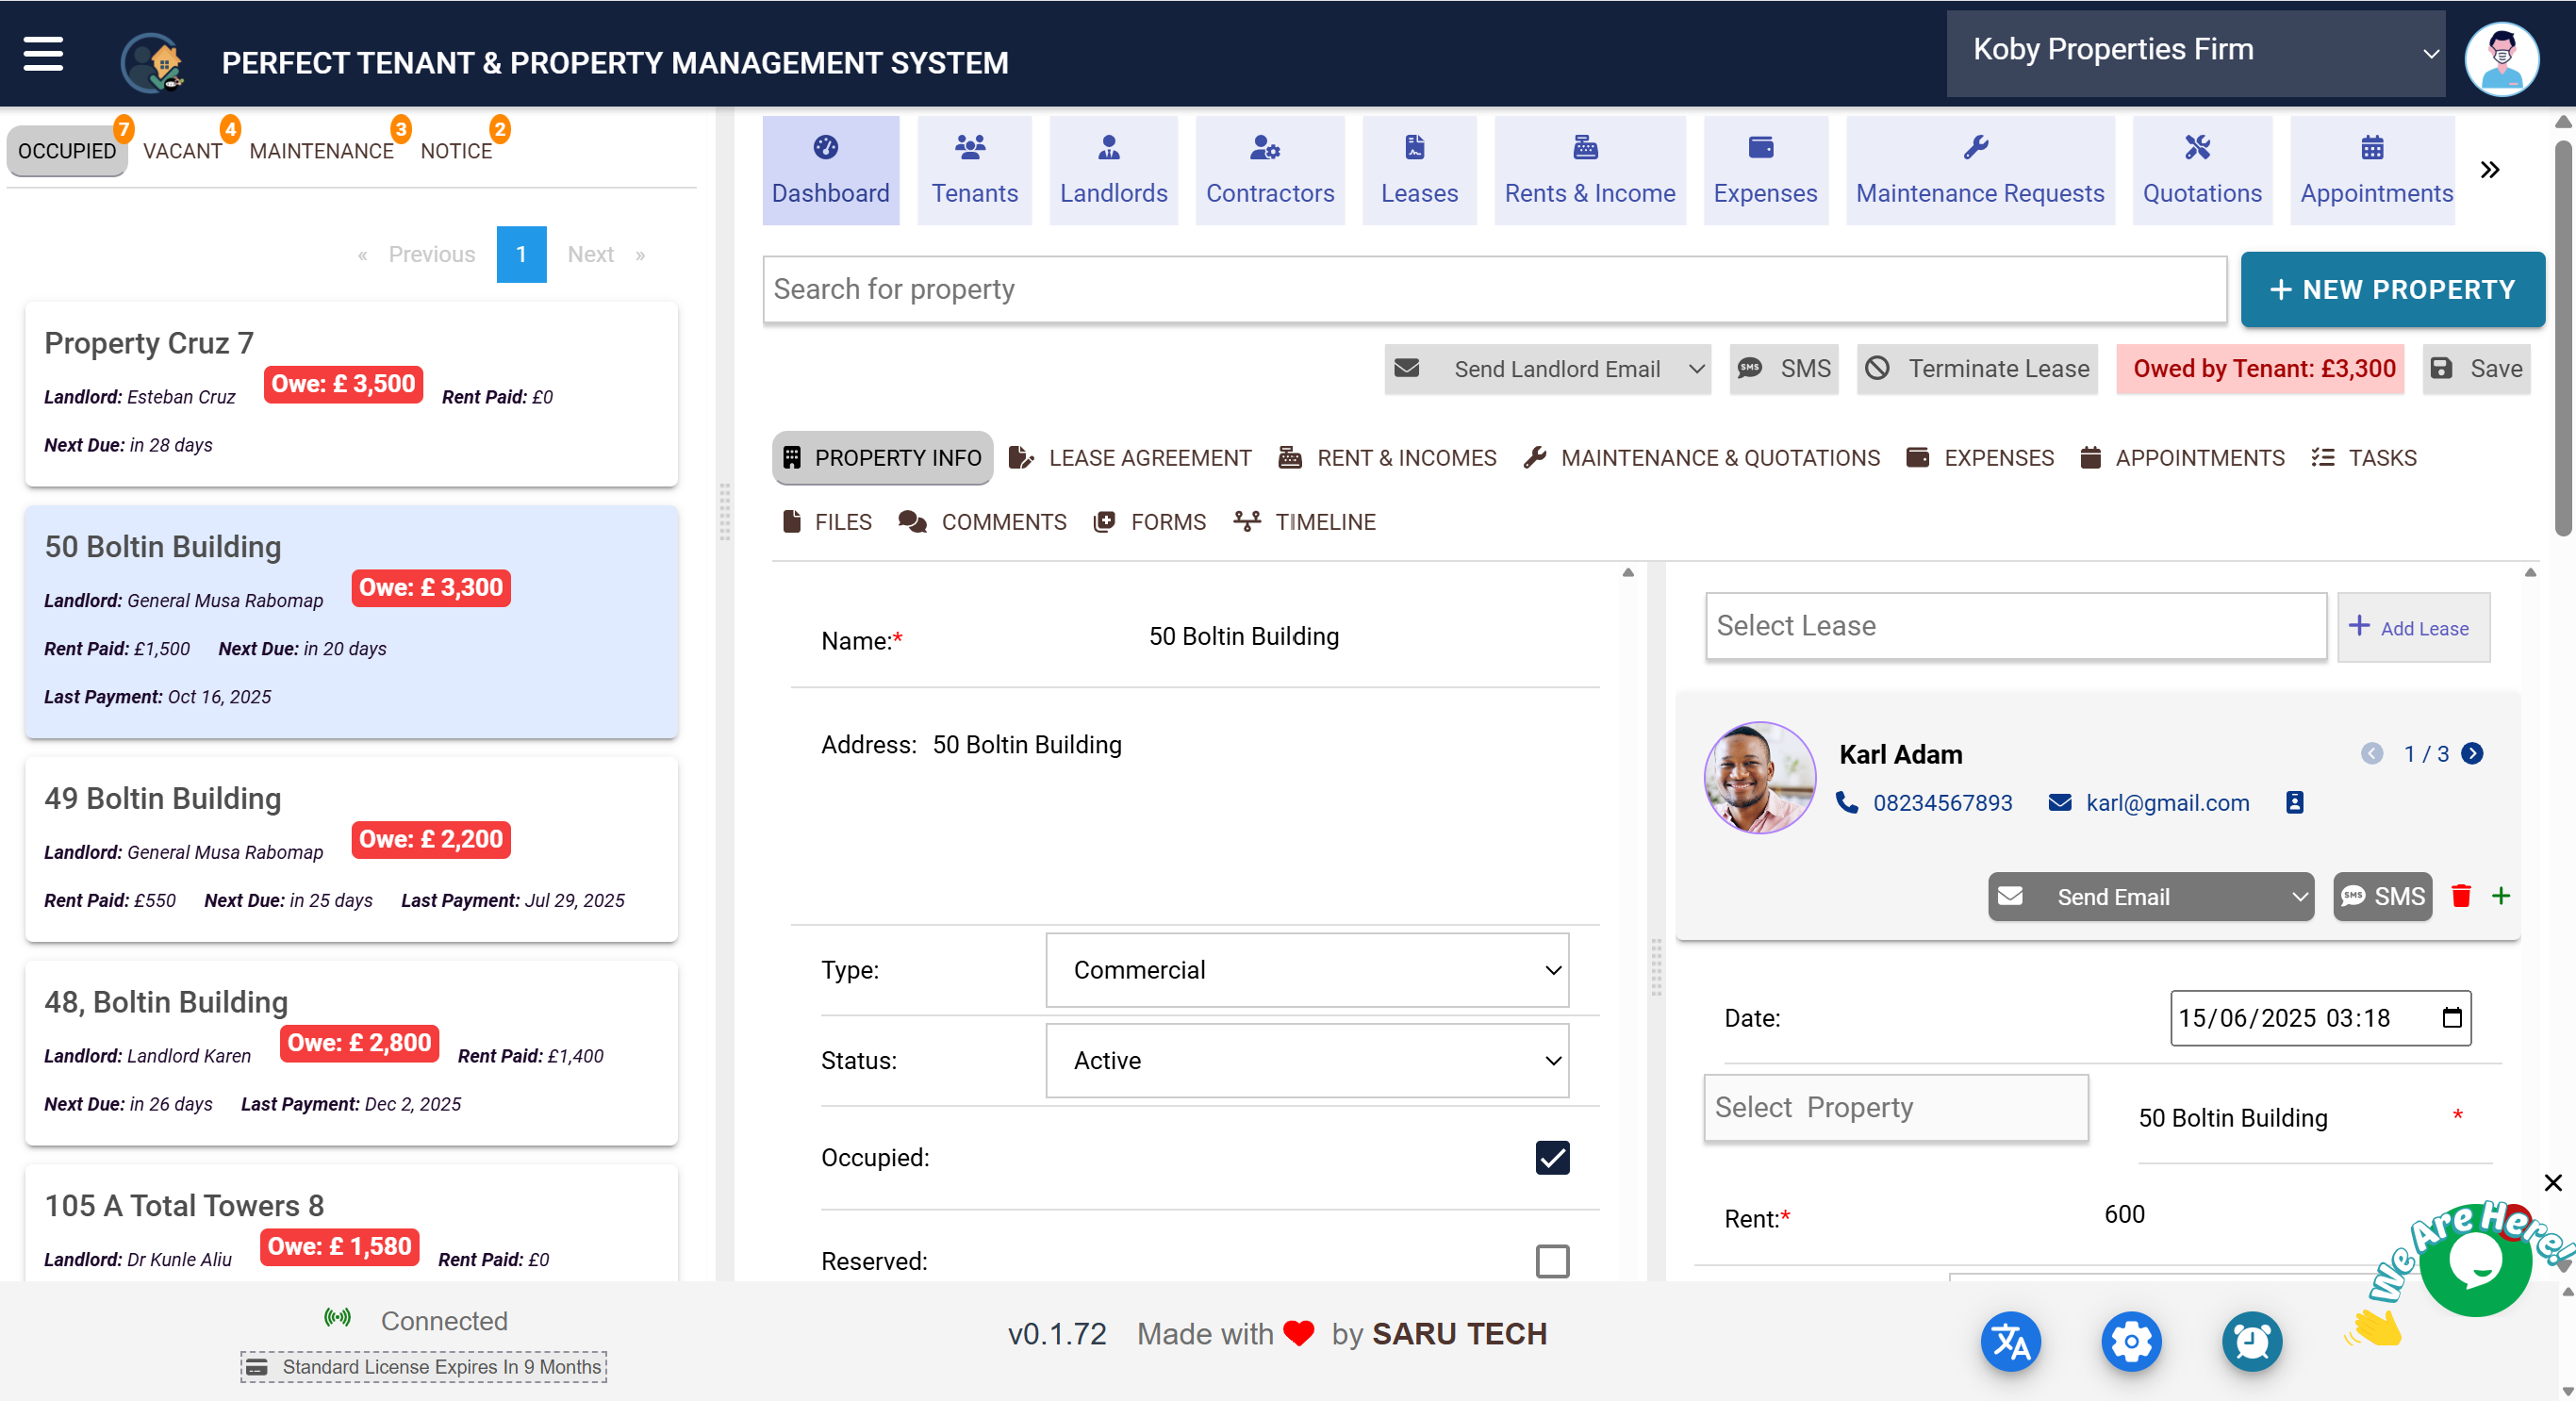
1a. Property Info
This tab holds the core information about the property :
- Property name and address
- Property type (Residential, Commercial, Mixed Use)
- Status (Active or Inactive)
- Occupancy flags: Occupied, Reserved, Under Maintenance, Termination Notice
- Landlord details (name, email, phone)
You can edit this info directly if you have permission. It’s usually the first place to go when adding a new property.
Note that all forms in the system including the property form is completely customizable in the settings. You can add fields, remove unnecessary fields (if they are not core to the system)
1b. Lease & Tenant Info
On the right side of the Property Info, page, you can Manage Leases and Tenants for the Property. Over time, a property would have various lease or contract with different tenants. By default this panel would show the current lease but you can switch to a past lease using the sarch box at the top of the page.
Adding Lease
Click on the + button to add a new lease. Define the:
- Lease Start/end dates
- Rent amount and deposit
- Payment frequency (Monthly, Weekly, etc.)
- Comission: If you are managing the property for a landlord, you can set a fixed amount comission that you get for the lease, or you can set this as a percentage of the rent.
- Tenant contact details
- Either upload the Lease document (PDF/contract) or use the Lease Agreement Tab to setup a digital lease agreement that can be signed digitally by all parties
Tenant Profile
💡 At the top, the tenant’s profile is displayed:
- Name, mobile, email
- File number
- Address
- Gender
- Profile image
The system supports having multiple tenants on a lease (Co-tenancy). So you would be able to add more than one tenant and enter their information. Use the right and left arrow on the tenant panel to scroll through all tenants on this tease
✉️ Send Email
Use this to send a predefined email template to the tenant.
- Click the email icon (envelope).
- A dropdown will appear with a list of email templates (e.g., “Welcome Email”, “Rent Reminder”).
- Select the desired template.
-
The system will automatically:
-
Fill in the placeholders like
{{lease_tenant_name}},{{name}},{{lease_rent}} - Send it to the tenant’s email.
-
Fill in the placeholders like
📌 You can only use this feature if a tenant is linked to the property.
💬 Send SMS
Click the SMS icon to send a text message directly to the tenant’s mobile number.
This is handy for short messages like:
- “Your rent is due tomorrow.”
- “Maintenance has been scheduled.”
📌 Again, only enabled if there’s a tenant attached to the property.
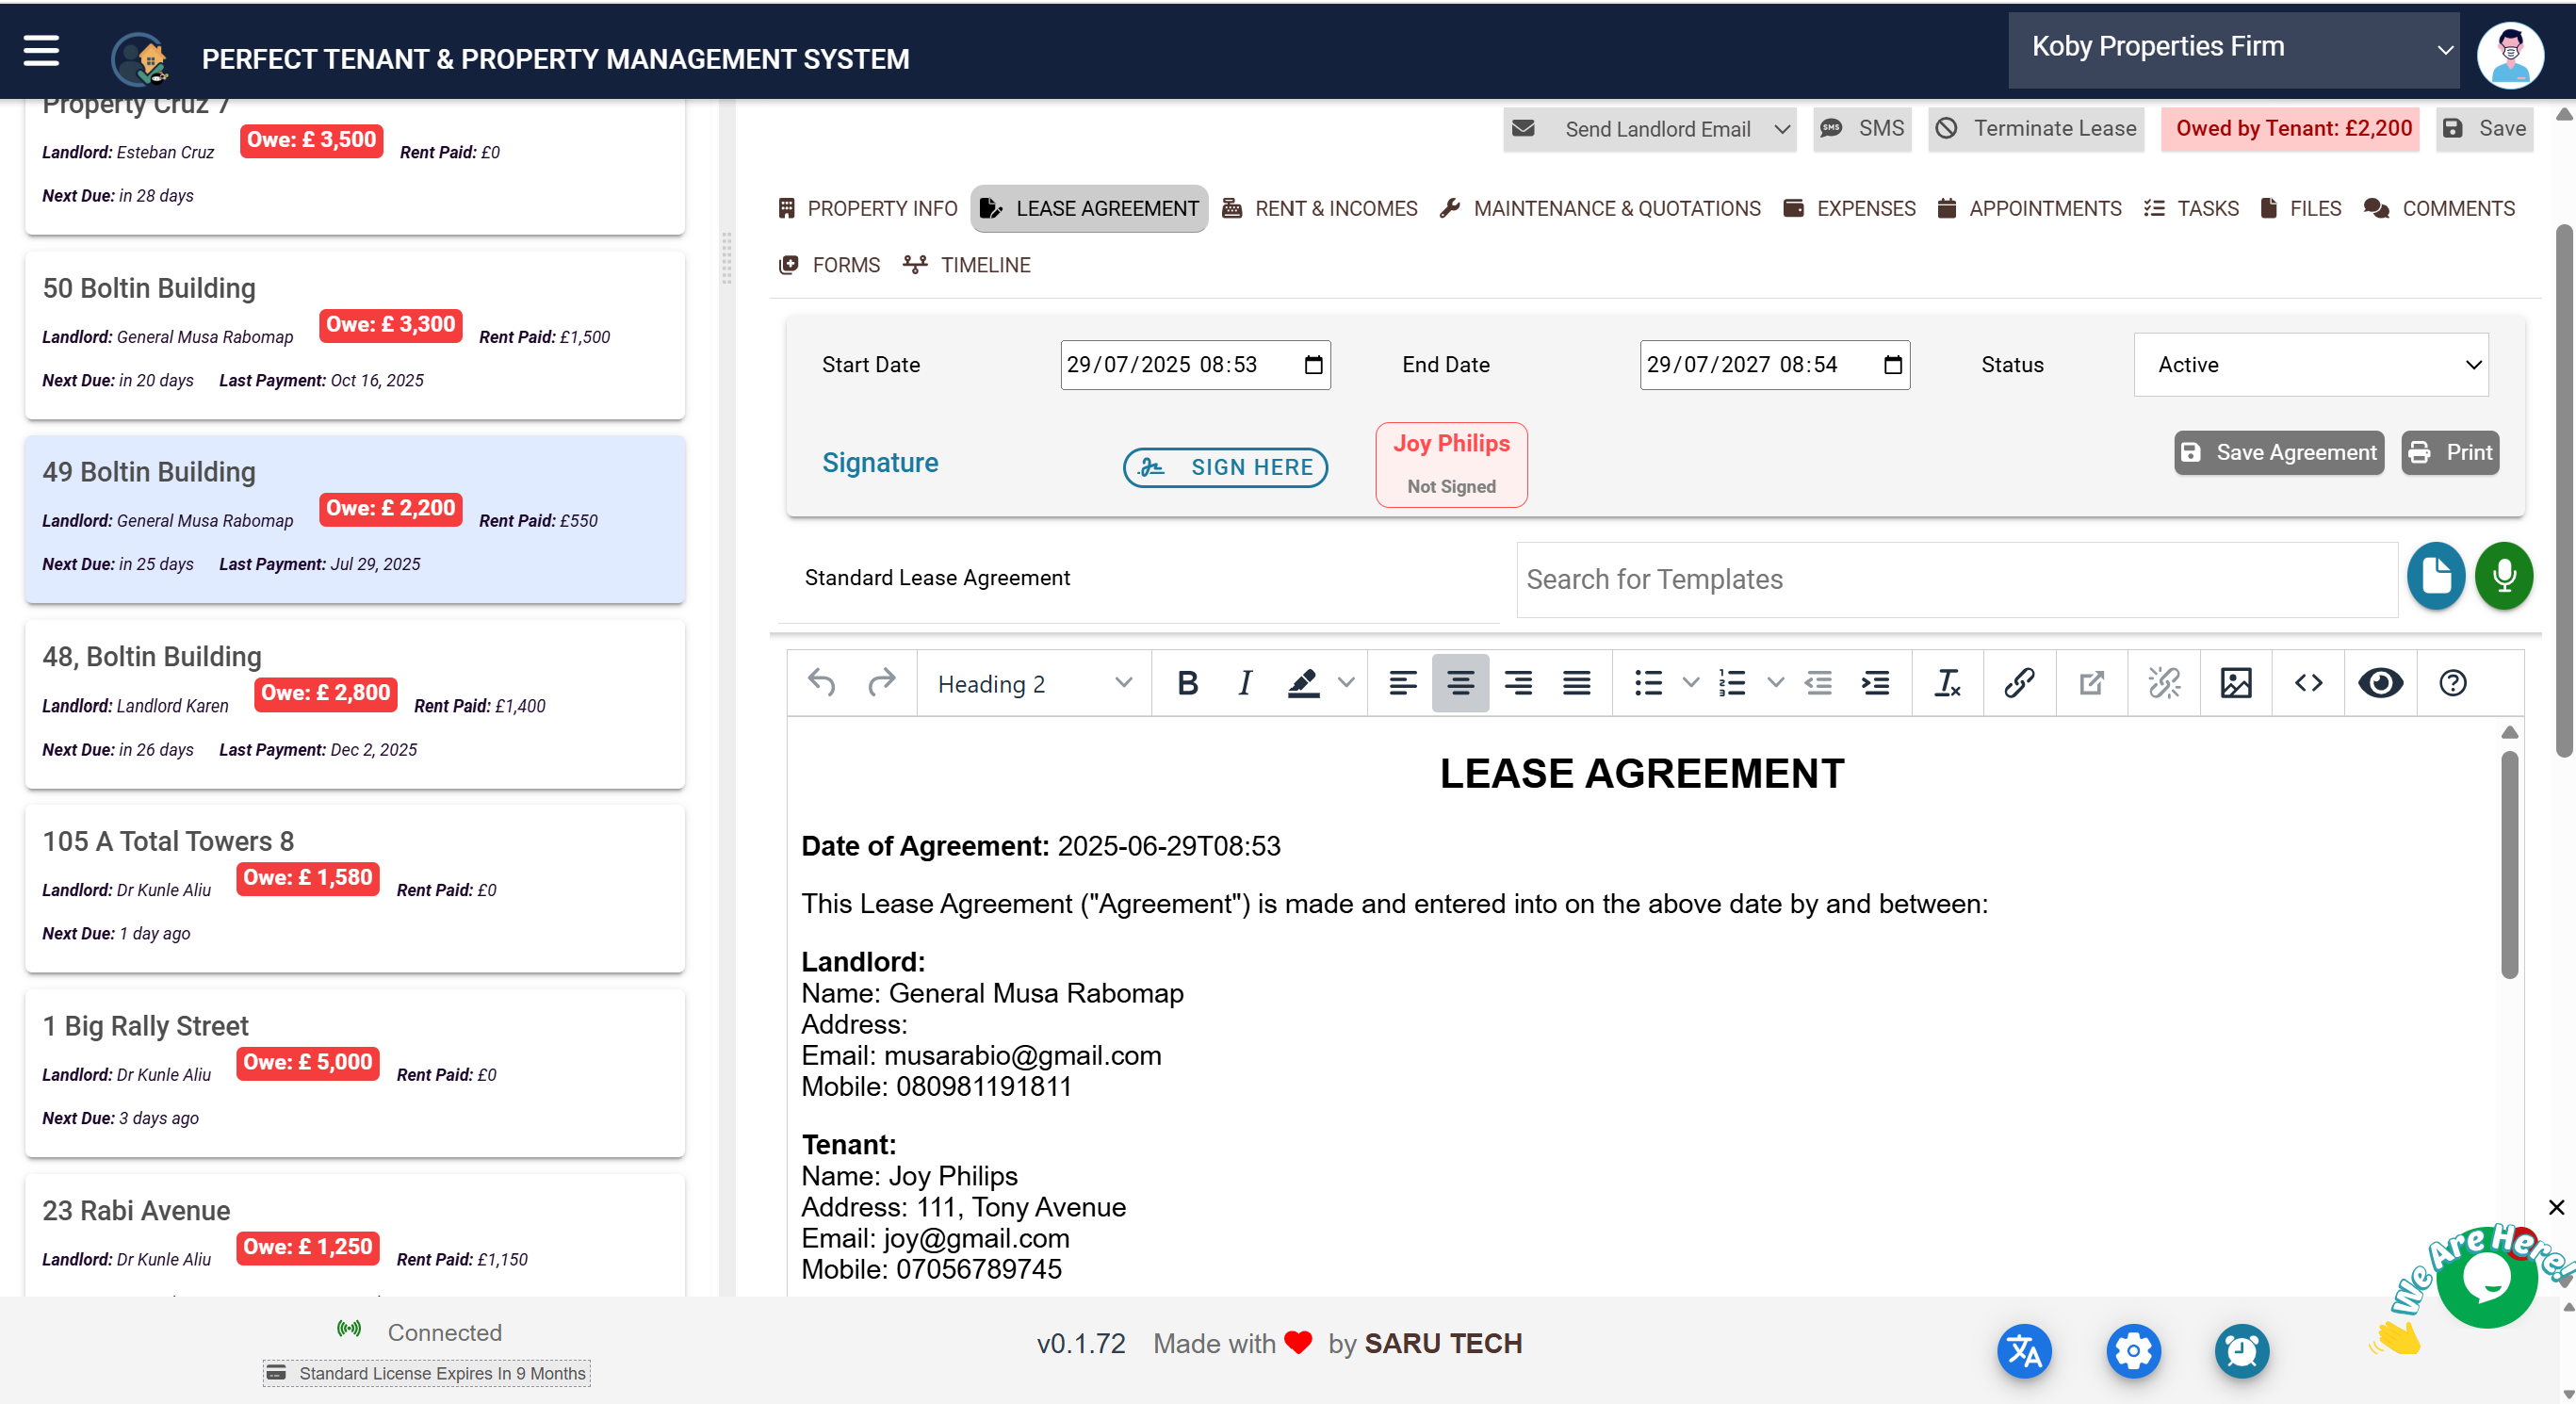
💸 2. Lease Agreement
The system allows you to create a digital lease agreement. There are inbuilt lease agreement templates, and you can add your own template. Select one of the Template if you would like to create a digital Lease Agreement.
- The system would then populate all placeholder data in the lease agreement template with information on the lease
- You would then be able to sign the Lease. Once a lease agreement has been signed by any party, it is no longer editable
- The Lease would also be available in the Tenant Portal where the tenant can sign the lease
- You would be able to monitor progress and see who has signed and who is yet to sign
- Once all parties have signed the Lease becomes active
Click the ban icon to mark the lease as terminated .
Once confirmed:
- The lease status will be updated
- Notifications can be triggered (e.g., emails)
- The system will expect a new lease to be created before rent can be collected again
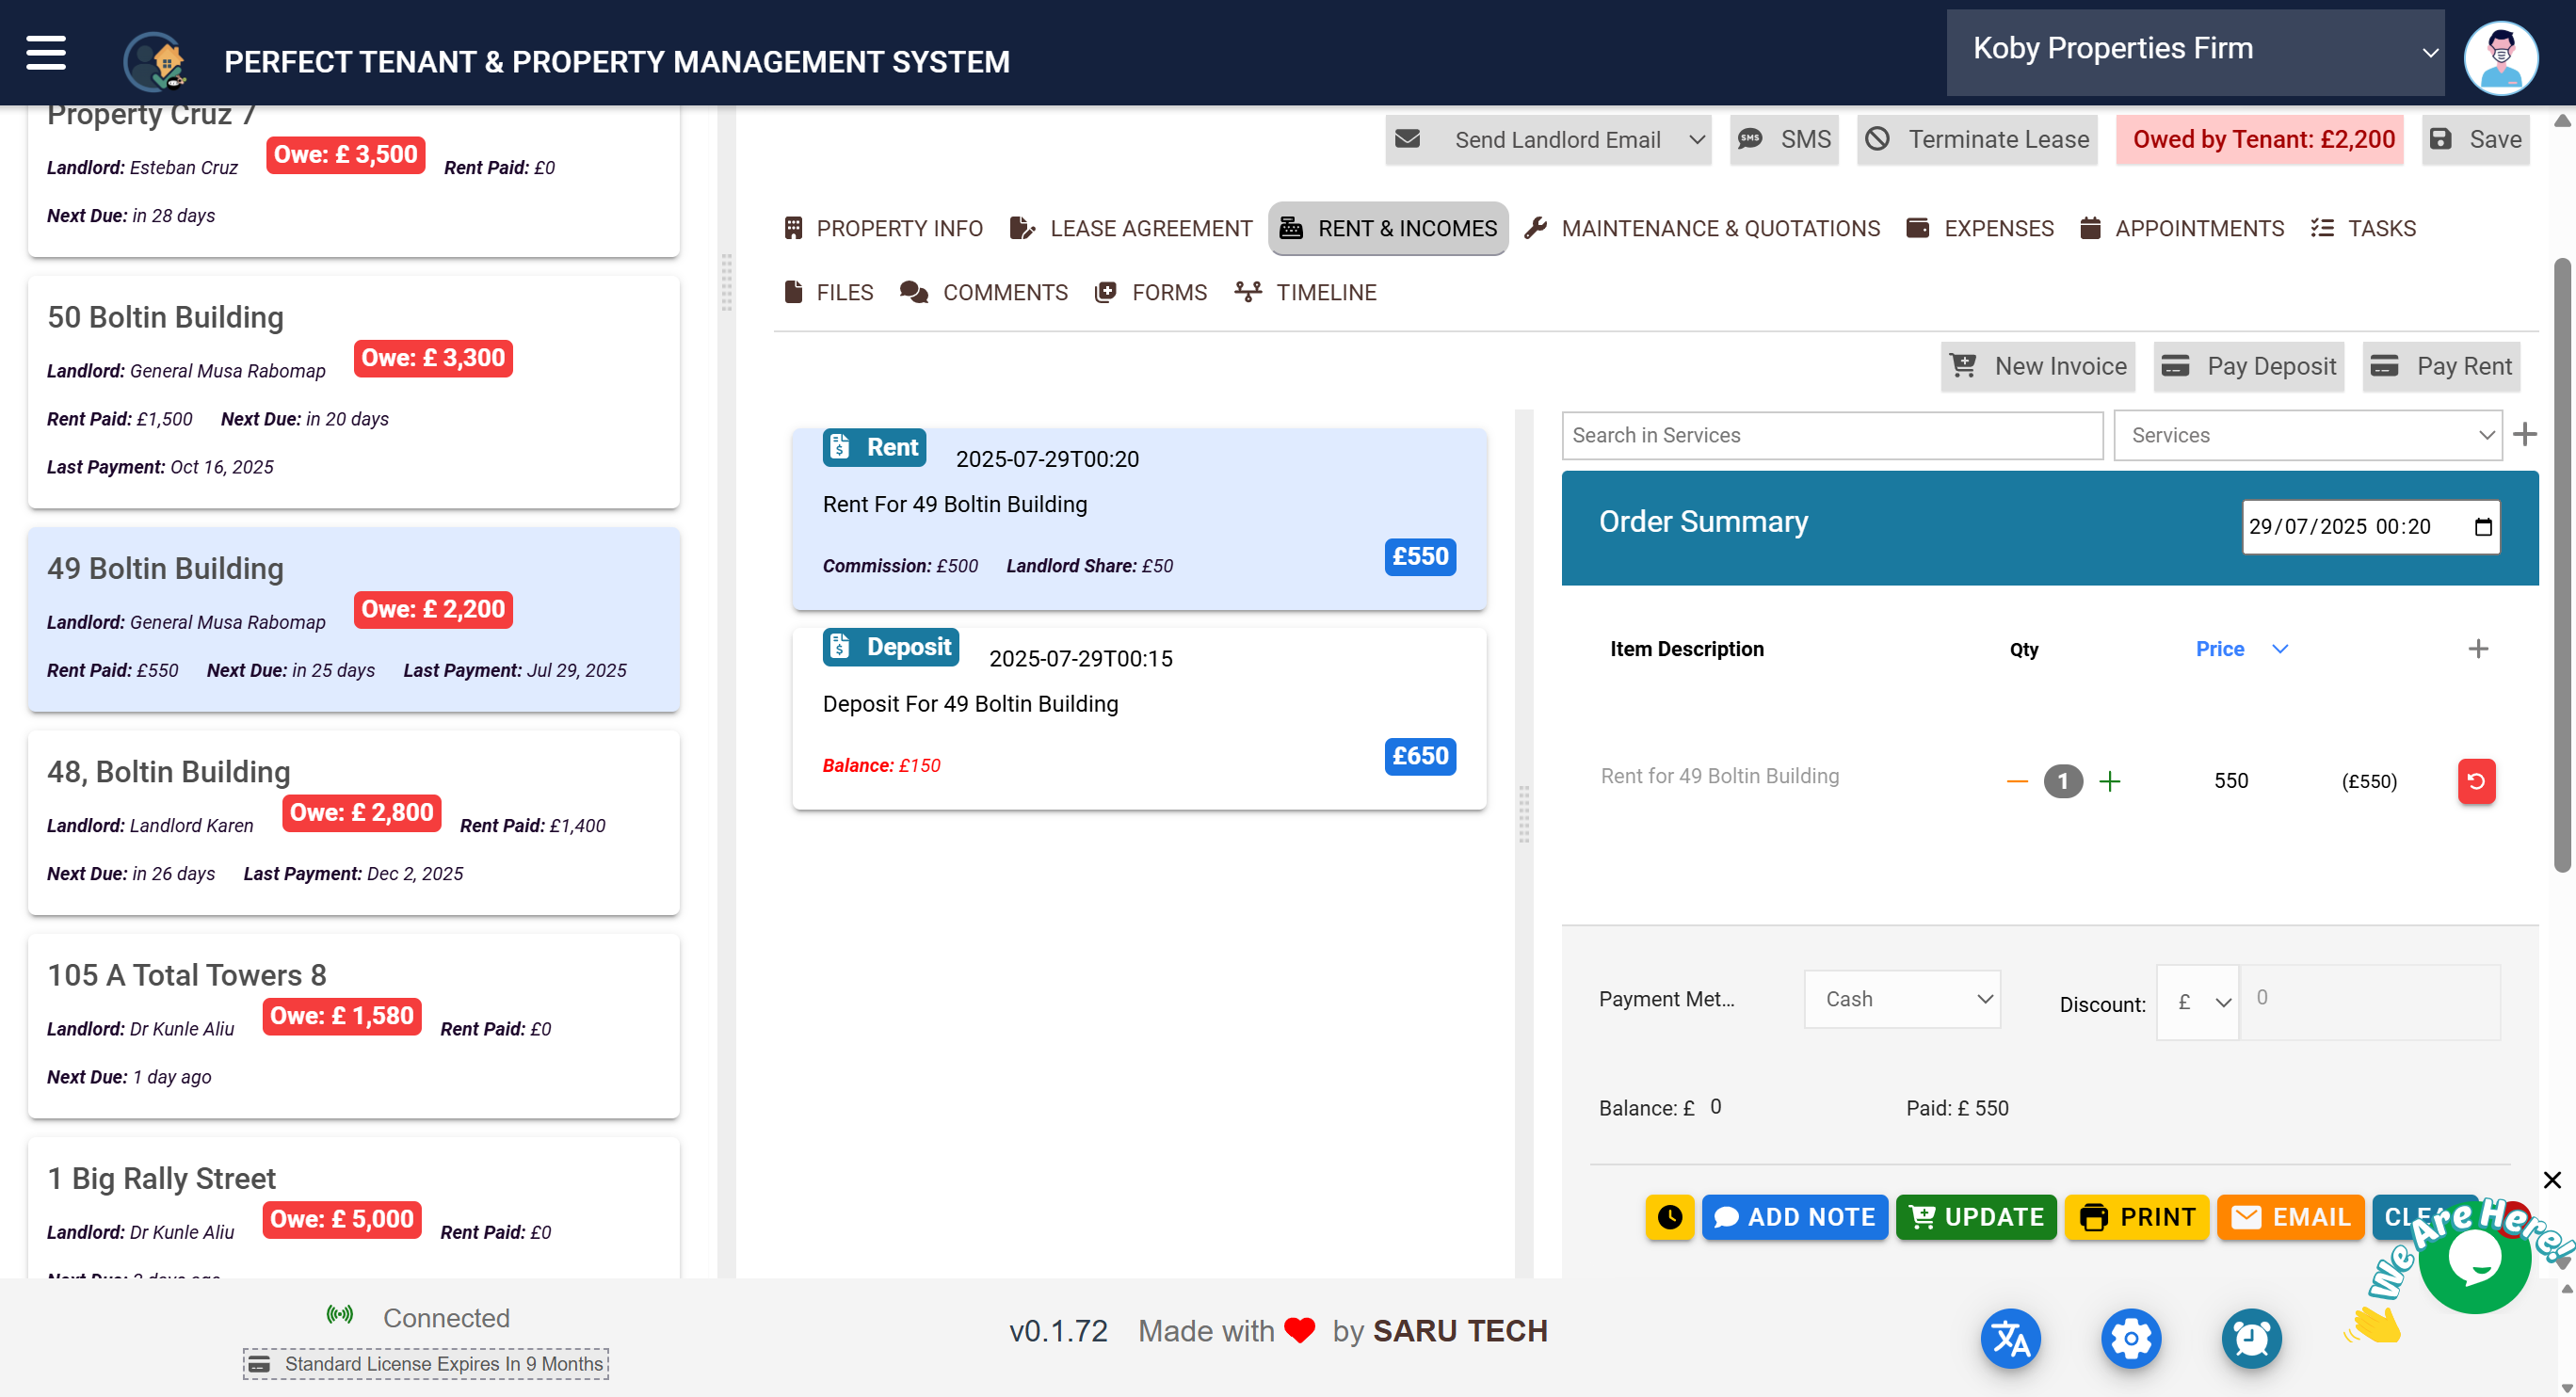
💸 3. Rent & Incomes
This tab shows every payment and income record linked to the property.
This includes:
- Rent payments
- Security deposits
- Any invoice or payment from tenants or landlords
- Commission and landlord share calculations
The page acts as a full invoicing and payment management system , allowing you to:
- Create invoices
- Add items, tax, discount, and notes
- Track payment history and partial payments
- Print or email invoices and receipts
- Automatically calculate commission splits
The system automatically keeps track of:
- How many rent periods have passed
- How much rent the tenant should have paid
- How much they have actually paid
- The amount currently owed
- Overdue date and next due date
- Last payment date
Every time rent is paid, the system calculates how the payment should be shared between landlord and agency.
Tenants can pay from the Tenant Portal, or you can manually record payments. Online payment supported: PayPal, PayStack, Stripe
Most users setup standing order and then record rent payment manually.
🛠️ 4. Maintenance & Quotations
The System provides a comprehensive Maintenance and Qotation Management System Tenants can raise a maintenance request via the Tenant Portal or you can also raise a maintenance Request Here
- Add new maintenance requests
- Enter descriptions and upload images
- View existing maintenance history
- See statuses: Pending, In Progress, Completed, Cancelled
- Send request quotations to contractors
- Assign tasks to maintenance personnel
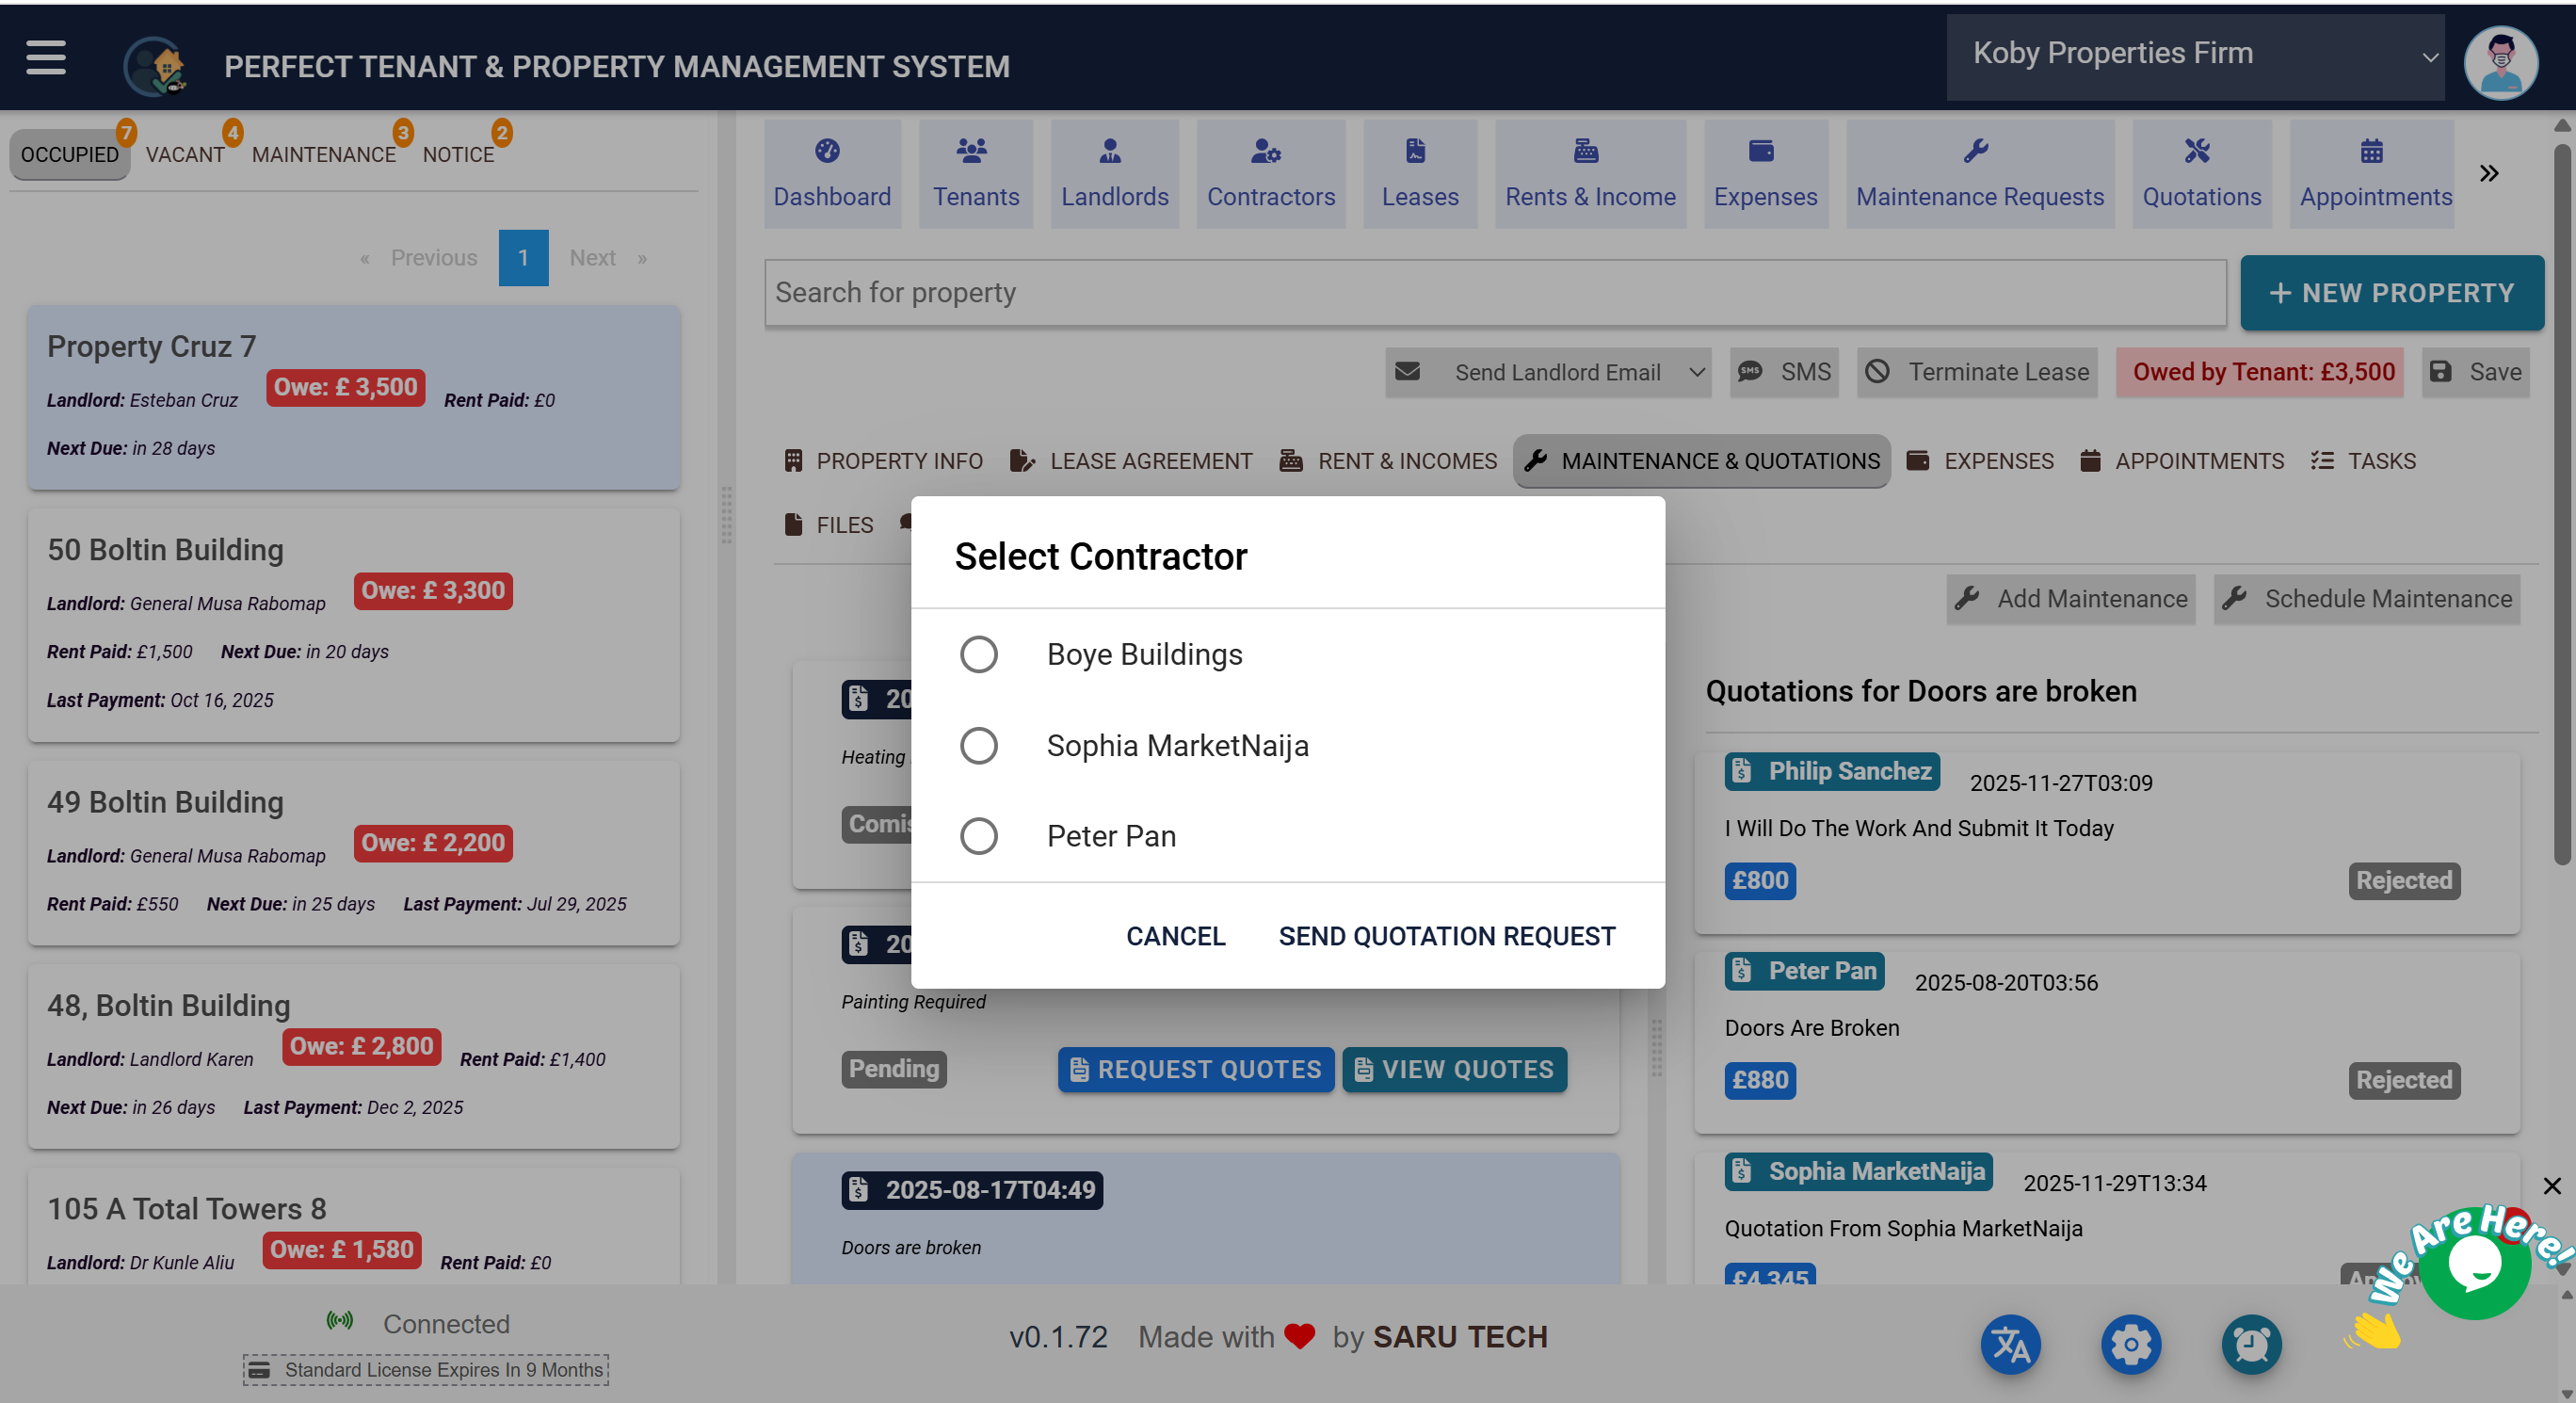
How to receive quotations
- Click on Request Quotation
- Select the contractor
- The system generates an email with a unique URL for the contractor
- Contractor enters quotation directly
- You can approve one quotation and others get rejected automatically
- Contractor can upload completion photos and raise an invoice
- Invoices appear in expenses and can be transferred to tenant or landlord
Preventive Maintenance
- Schedule maintenance for equipment/assets
- Set start date and frequency
- System adds reminders to calendar
- Technicians enter work done and upload documents/photos
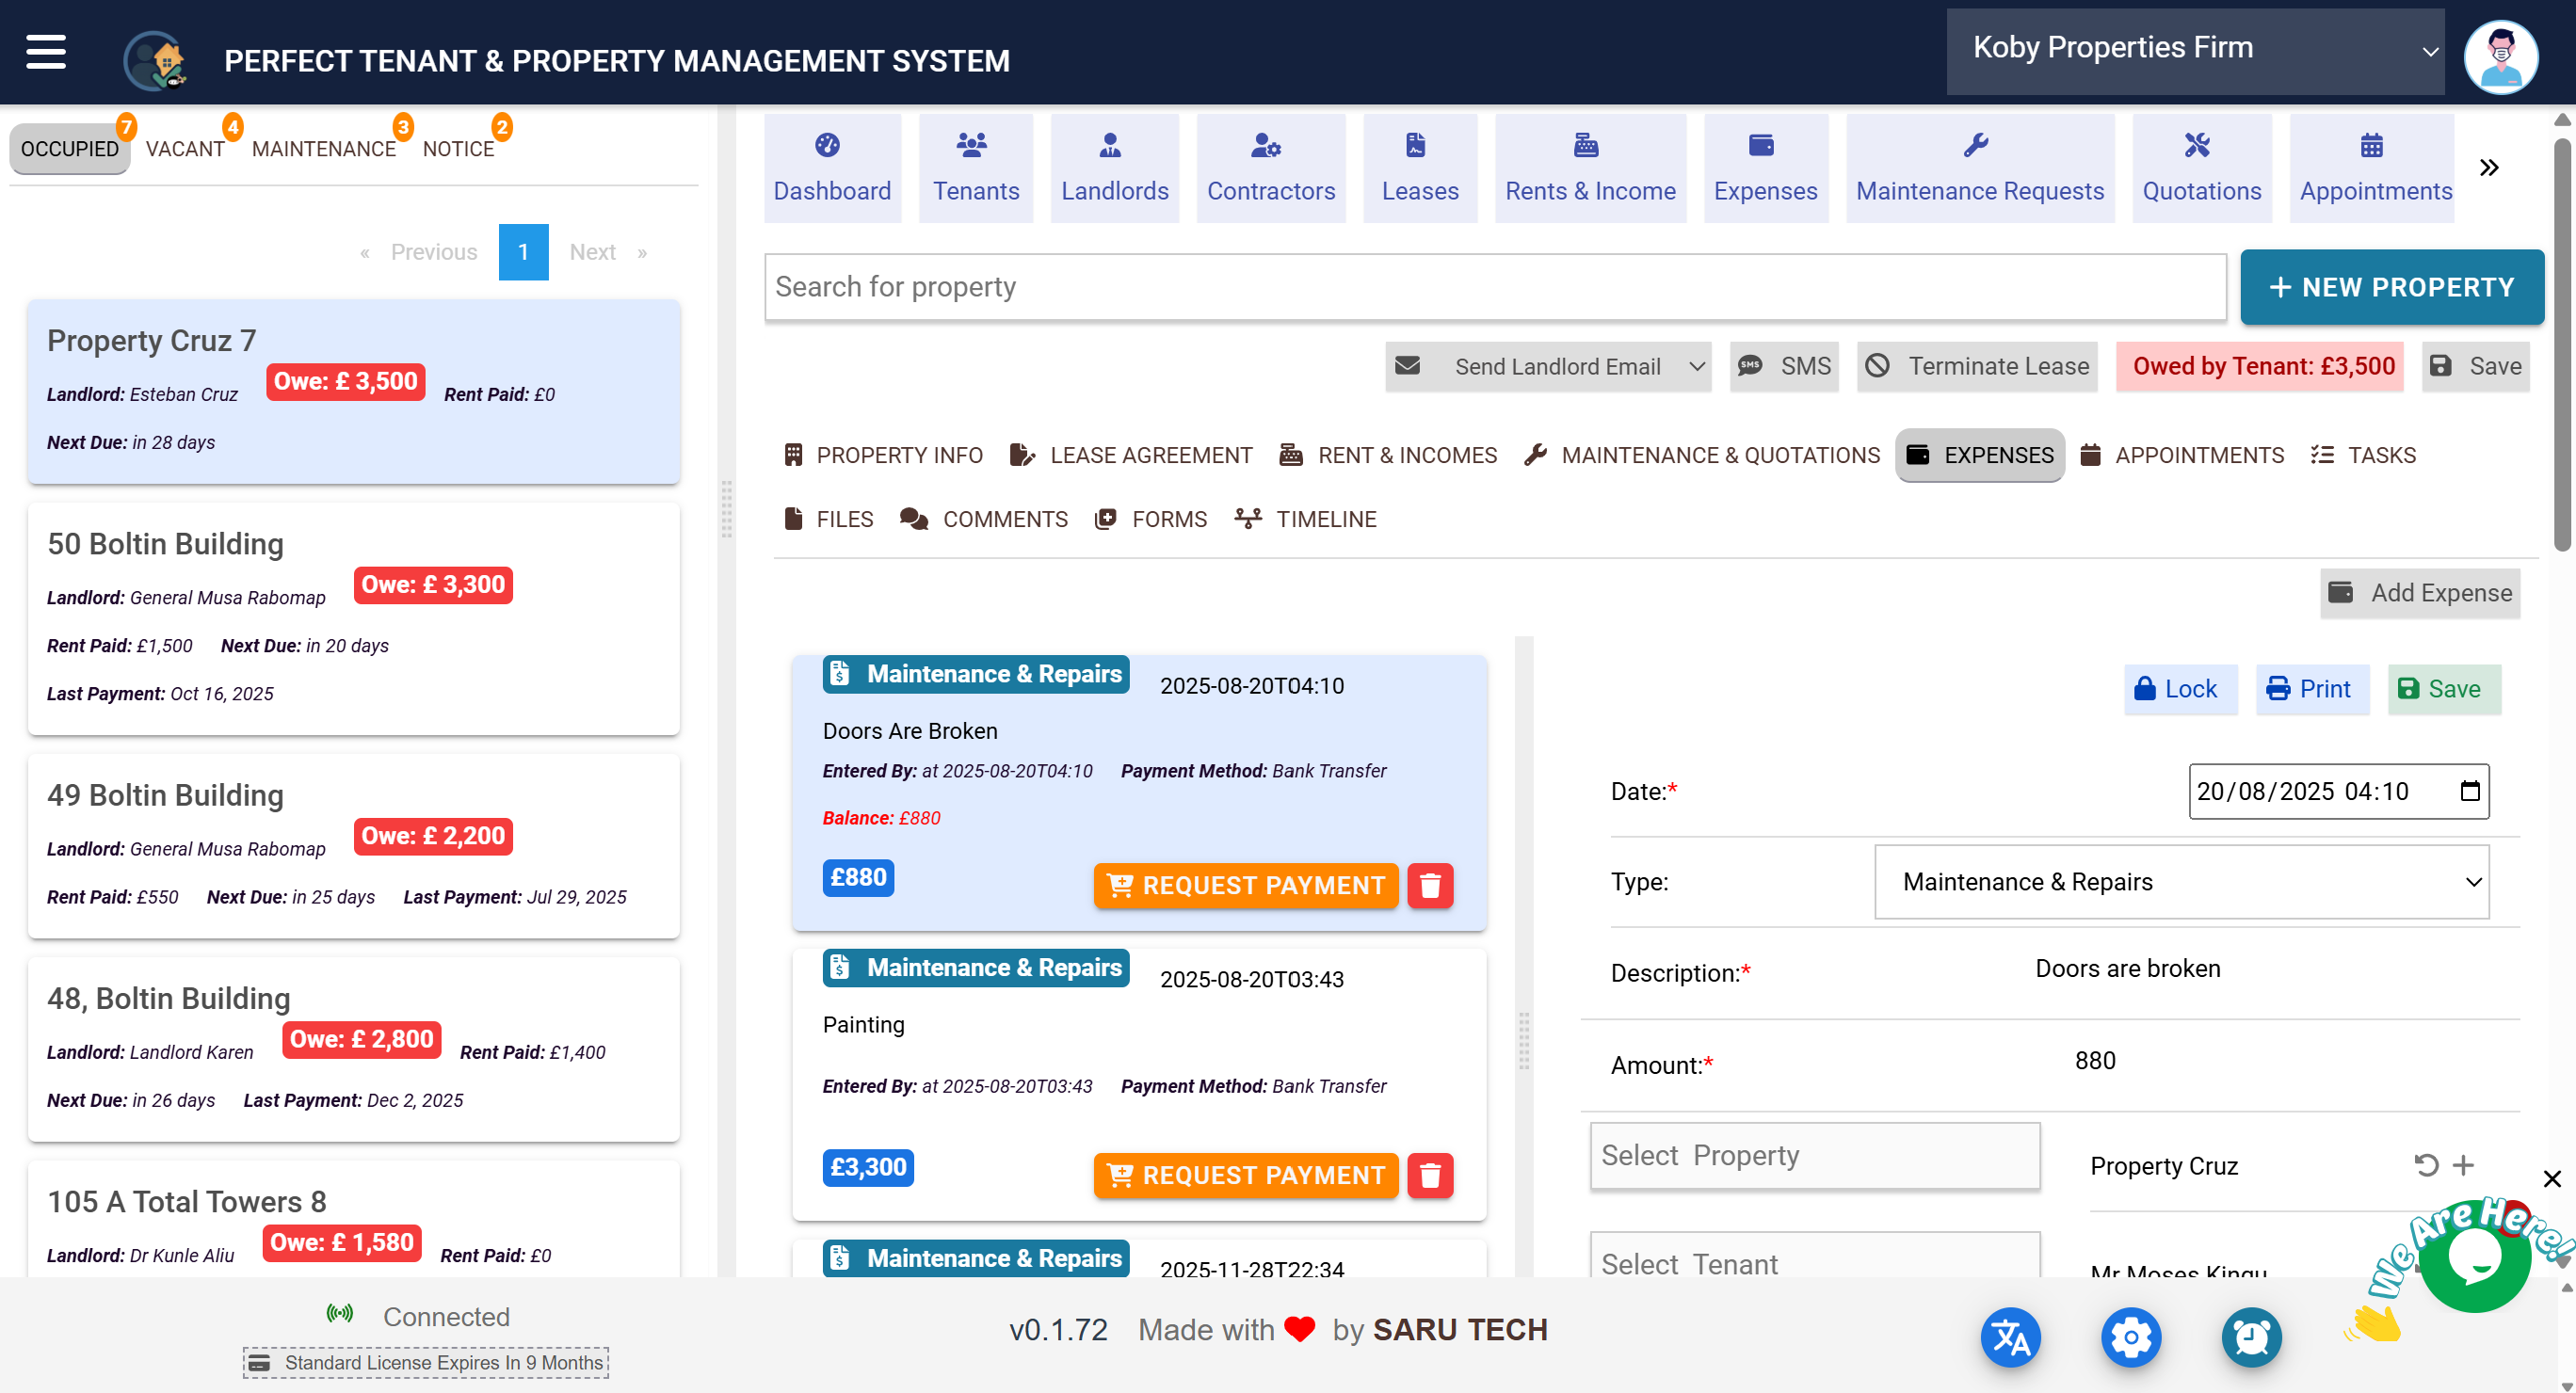
💳 5. Expense
Here you track outgoing costs related to the property:
- Add expenses like cleaning, repairs, inventory, salaries, etc.
- Each expense shows description, amount, who entered it, and how it was paid
🛒 You can optionally add an expense to a bill , and remove or edit it later.
📅 6. Appointments
This tab helps you manage and track all scheduled activities related to the property.
You can schedule appointments for:
- Viewing
- Inspection
- Lease Signing
- Maintenance Visits
- Move-in / Move-out
- Tenant or Landlord Meetings
- Cleaning or Utility Setup
- Document Review
- Payment Arrangements
- Dispute Resolution
- Other custom types
Each appointment includes:
- Date and Time
- Type of appointment
- Description
- Status (e.g., Pending, Completed, No Show)
- Related Tenant (if applicable)
📌 Click an appointment card to view or modify the details.
📅 You can also schedule new appointments directly from this tab or by using the “Add Appointment” button at the top toolbar.

🧾 7. Tasks
Tasks are great for internal reminders and team coordination .
Each task includes:
- Title and description
- Assigned staff/user
- Priority level: Urgent, High, Medium, Low
- Status: Todo or Completed
- Due date
- Linked property and timeline
Use this tab to:
- Track what needs to be done
- Assign responsibilities
- Check progress at a glance
💡 Tasks show icons to quickly:
- Edit 🖊
- Delete 🗑
- See who it’s assigned to
- View completion status
📁 8. Files
The Files tab is your digital cabinet for documents and uploads. Use this to store:
- Lease agreements (PDF)
- Inspection photos
- Tenant ID copies
- Bills or invoices
- Maintenance receipts
Features include:
- Upload Files (drag & drop or button)
- Preview PDFs and images
- Delete files
- Mark key images for inclusion in reports
⚠️ Files are tied to individual properties — make sure you are viewing the right one before uploading.
💬 9. Comments
This is your internal notes system .
Use the Comments tab to:
- Leave remarks about the property
- Record verbal agreements or discussions
- Communicate context to other team members
📝 Comments are only visible to system users (not tenants or landlords).
🕓 10. Timeline
The Timeline tab gives you a chronological history of every activity and change related to the property.
For example:
- Rent paid
- Lease signed
- Task completed
- File uploaded
- Appointment scheduled
- Comment added
Each timeline entry shows:
- What happened
- When it happened
- Who performed the action
- What module it came from
🔗 Some entries have links to the original item — click to open.
This is incredibly useful for auditing and tracking how a property is being managed over time.
📘 Managing Tenants, Income, Expenses, Maintenance & Leases from the Main Menu
While most actions are available inside the property detail view , you can also manage everything from the main navigation menu for better visibility across all properties.
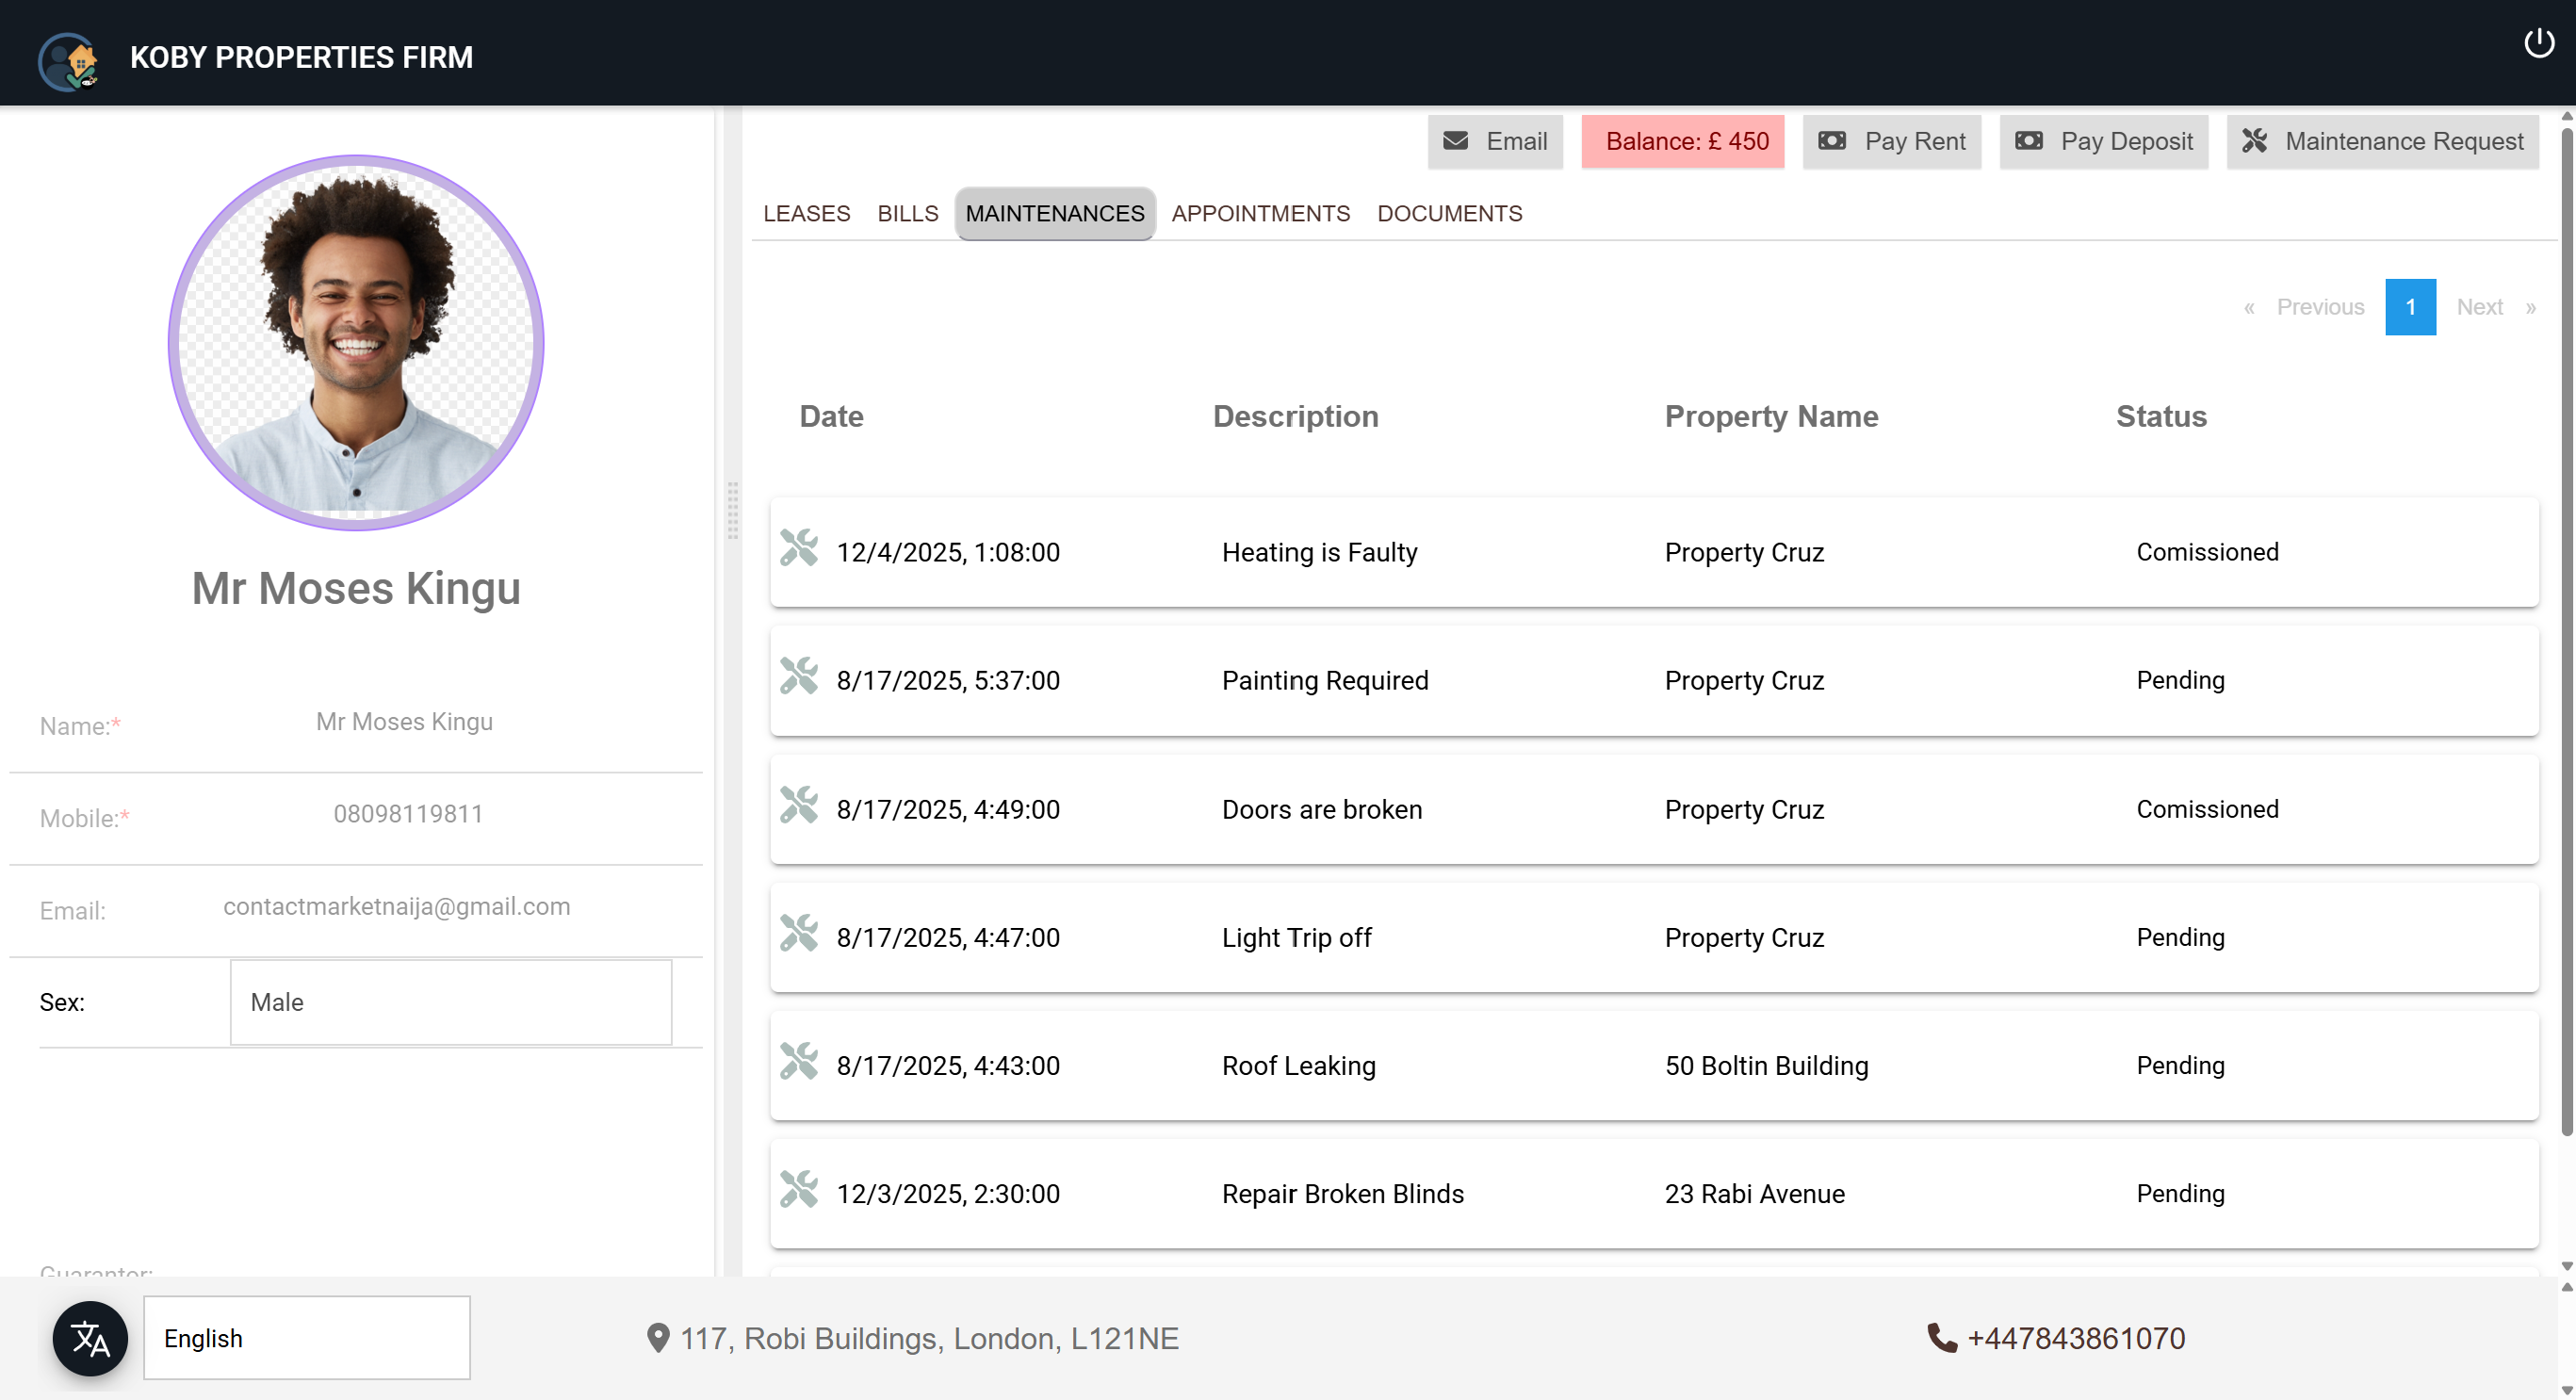
👤 1. Managing Tenants
In the Tenant page:
You can see a full list of all your tenants across properties.
Each tenant record contains:
- Full Name
- Mobile Number (required)
- Address
- Gender
- Guarantor (optional)
- Profile image
Additionally, each tenant is linked to:
- One or more leases
- A history of income (payments made)
- Any expenses incurred on their behalf
- Maintenance requests they raised
- Appointments scheduled
- Inspections
- Their uploaded documents
📌 You can click into a tenant to update their details, review linked records, or add new documents.
This page is useful for:
- Updating contact information
- Checking tenant history
- Uploading ID copies or signed leases
- Reviewing all payments and appointments related to a specific person
💵 2. Managing Income
The Income page shows all money received by your business, including:
- Rent
- Deposits
- Fines
- Other income (e.g., service fees)
Each entry includes:
- Date of payment
- Amount and payment method
- Description
- Linked tenant
- Linked property (optional)
- Recorded balance or pending amount
- Staff member who entered the record
You can:
- Add income manually
- View totals for the year
- Filter by tenant or type (Rent, Deposit, Other)
📌 This is where you get a global view of all payments received.
💳 3. Managing Expenses
Go to the Expense page to view all outgoing costs related to managing properties.
Expenses can be of the following types:
- Maintenance & Repairs
- Cleaning
- Salaries
- Inventory
- Utility Bills
- Debts
- Reimbursements
Each record includes:
- Description
- Date and amount
- Payment method
- Property and tenant involved (if applicable)
This page is useful for:
- Tracking property operating costs
- Preparing financial reports
- Managing cash flow
🛠️ 4. Managing Maintenance
The Maintenance module shows all requests across all properties .
For each maintenance record, you can view:
- Property and tenant it relates to
- Date scheduled
- Description of issue
- Status (Pending, In Progress, Completed, Cancelled)
- Assigned user (staff handling it)
- Attached images or files
From here, you can:
- Schedule new maintenance
- Reassign existing tasks
- Track unresolved requests
- Audit completed jobs
This gives you a portfolio-wide view of maintenance activity.
📄 5. Managing Leases
In the Lease page, you can view all leases — active, expired, terminated, or pending.
Each lease includes:
- Property and tenant info
- Lease start and end dates
- Rent and deposit details
- Payment frequency (Monthly, Weekly, etc.)
- Contract file (PDF or DOC)
- Status (Active, Terminated, etc.)
- Tenant and landlord contact info
- Signatures
This view is ideal for:
- Finding leases that are about to expire
- Verifying lease terms
- Checking overdue tenants
- Uploading or downloading contracts
💡 You can also create new leases directly from this page.
📘 Appointments, Tasks, Files, Email Templates & Reporting Tools
📆 1. Appointments (Global View)
From the Appointments page, you can manage all scheduled activities across your portfolio. This includes:
- Viewings
- Lease Signings
- Inspections
- Move-In / Move-Out visits
- Maintenance checks
- Meetings with tenants or landlords
- Dispute resolution appointments
Each appointment includes:
- Date and time
- Type (selected from a detailed list)
- Description
- Property and tenant linked
- Status (Pending, Completed, No Show, etc.)
This is ideal for:
- Seeing everything happening today or this week
- Coordinating viewings for multiple vacant properties
- Tracking follow-ups or overdue appointments
🛠 Appointments scheduled from this page are automatically added to the property and tenant records.
✅ 2. Tasks (Global Task Manager)
In the Tasks section, you can see a master list of all to-dos and assignments.
Each task shows:
- Title and description
- Status : Todo or Completed
- Priority : Urgent, High, Medium, Low
- Assigned to (staff user)
- Due date
- Property it’s linked to
You can:
- Assign tasks to yourself or others
- Track by priority
- Filter by property or assignee
This is useful for:
- “Inspect Unit 4B”
- “Renew Lease for John Doe”
- “Request plumbing quote”
📁 3. Files (Document Uploads and Viewing)
Documents are tied to the following entities:
- Properties
- Tenants
- Leases
- Appointments
- Maintenance tasks
From any page where attachments are available, you can:
- Upload a file via drag-and-drop or “Upload File” button
- Preview PDFs, DOCs, or images
- Mark key images for use in printed reports
- Delete outdated or duplicate files
Use the Files tab within each entity to manage their documents in context, or use the global file viewer (if enabled) for central access.
✉️ 4. Email Templates
The system includes a library of automated email templates with placeholder tags like:
-
{{lease_tenant_name}} -
{{name}} -
{{lease_rent}} -
{{lease_date_start}}
Examples of available templates:
- Welcome Email
- Rent Payment Reminder
- Overdue Notification
- Lease Expiry Notice
- Maintenance Schedule Alert
- Viewing Confirmation
- Thank You after Lease Ends
You can:
- Customize or create new templates
- Trigger emails manually from the property toolbar
- Save time by using auto-filled data
📊 5. Reports & Timelines
While formal reporting tools may be separate, the app offers built-in visibility through:
- Timeline tab for each property (tracks every action: rent paid, file uploaded, lease changed, etc.)
- Home Summary counts showing yearly income, number of leases, and maintenance tasks
- Badges showing pending maintenance, overdue tasks, or pending approvals
This helps you:
- Monitor operations
- Audit changes
- Prepare for reviews or inspections
📘 PART 7: Common Use Cases & Daily Scenarios
This section focuses on real-world workflows —the tasks property managers, assistants, and landlords perform every day. These examples show how the system simplifies routine operations and ensures accuracy across your portfolio.
🏠 SCENARIO 1: A New Tenant Is Moving In
When securing a new tenant for a property, the onboarding process is quick and streamlined. Here's the typical workflow:
-
Add the Property (if not already created)
- Enter the property name, category (e.g., Residential, Apartment, Studio), and address.
- Add landlord details and property status.
-
Create a New Lease
- Open the Lease & Tenant tab.
- Click the ➕ icon to add a lease.
- Enter rent amount, payment frequency, deposit, and start/end dates.
- Select an existing tenant or create a new one.
- Upload the lease contract OR prepare a digital lease agreement.
-
Review and Complete Tenant Profile
- Confirm mobile number and email.
- Upload ID documents and proof of address.
- Add guarantor information if required.
-
Send a Welcome Email
- Choose “Welcome Email to New Tenant” from the email dropdown.
- The system auto-fills: tenant name, property name, rent amount, and lease dates.
✅ Once completed, the system updates occupancy automatically, and rent reminders start based on the lease frequency.
💸 SCENARIO 2: Collecting Rent
When the tenant pays rent—either via standing order, bank transfer, or through the Tenant Portal—you can quickly record it:
- Open the property from the Occupied tab.
- Navigate to Rent & Incomes .
- Click “Add Rent Payment” or the plus button on the toolbar.
- Enter the amount, date, payment method, and reference.
- Save the payment.
The system automatically:
- Updates the property balance
- Splits the payment between landlord & agency (if commission applies)
- Adjusts the tenant’s rent status
- Updates overdue & next-due information
📩 You can send a “Rent Receipt Confirmation” email immediately after saving.
🔧 SCENARIO 3: Handling a Maintenance Request
Maintenance issues can be raised by tenants through the Tenant Portal, or you can record them manually.
- Open the property and go to the Maintenance & Quotations tab.
- Click “Add Maintenance Request” .
- Enter the description (e.g., “Kitchen tap leaking”).
- Upload photos if available.
- Select a contractor or maintenance staff to assign it to.
- Save the task.
🛠 The contractor can receive a quotation request email through the system and submit a quote using their Contractor Portal.
📝 SCENARIO 4: Lease Is Ending Soon
You may want to remind tenants early enough to prepare for renewal or move-out.
- Open the property.
- Go to Lease & Tenant Info .
- Check the lease End Date .
- Open the email dropdown and choose “Lease Expiry Reminder” .
📩 The tenant receives a personalised reminder with renewal options or instructions for vacating.
You can also create a follow-up task such as “Confirm renewal decision from tenant” .
📅 SCENARIO 5: Schedule a Viewing
When prospective tenants request a viewing, you can log and schedule it in a few clicks:
- Open the vacant property.
- Click “Add Appointment” .
- Select Viewing as the appointment type.
- Enter the time, client name, and purpose (optional).
- Save the appointment.
📩 You can send a “Viewing Confirmation Email” to the client with the appointment details.
💬 SCENARIO 6: Internal Notes and Audit Trails
Keeping track of user activity is essential for clean handovers and compliance. The system provides two powerful tools:
- Comments — for internal notes such as “Tenant reported noisy neighbours at 10 pm.”
- Timeline — a historical, timestamped record of all actions related to the property.
The Timeline records:
- Rent payments
- Lease changes
- Task completion
- Uploaded files
- Maintenance updates
- User actions and automated system updates
📌 This helps during handovers, audits, and when multiple staff manage the same property.